Part 1: Make the Biga (12-24 Hours Ahead)
Mix: In a medium bowl, combine the 190g bread flour, cool water, and ⅛ tsp yeast. Stir with a wooden spoon or your hand until it forms a shaggy, stiff dough. It will be dry and hard to mix—this is normal.
Rest: Cover the bowl tightly with plastic wrap and let it sit at cool room temperature for 12 to 24 hours. The longer it rests, the more flavor develops. It’s ready when it’s puffy, dotted with bubbles, and has a slightly sour, pleasant aroma.
Part 2: Make & Knead the Dough
Combine Ingredients: In the bowl of your stand mixer, combine the warm water, milk, and yeast. Let it sit for 5 minutes until foamy (if using active dry yeast). Tear the prepared biga into 6-8 small pieces and add it to the bowl. Add the 250g bread flour and salt.
Knead: Using the dough hook, mix on low speed for 3 minutes until the ingredients come together. Increase the speed to medium and knead for 8-10 minutes. This dough is famously wet and sticky—do not be tempted to add more flour! It will be more like a thick batter than a traditional bread dough. It should slap against the sides of the bowl and be very stringy and elastic.
First Rise: Lightly oil a large bowl. Using a bowl scraper or spatula (the dough will be too sticky to handle), gently transfer the dough to the oiled bowl. Turn it over once to coat it lightly in oil. Cover with plastic wrap and let rise in a warm place for 1 ½ to 2 hours, or until it has doubled in size and is full of large bubbles.
Part 3: Shape & Final Rise
Prepare Pans: Line a baker’s peel or the back of a baking sheet with parchment paper. Generously dust the parchment with flour or semolina.
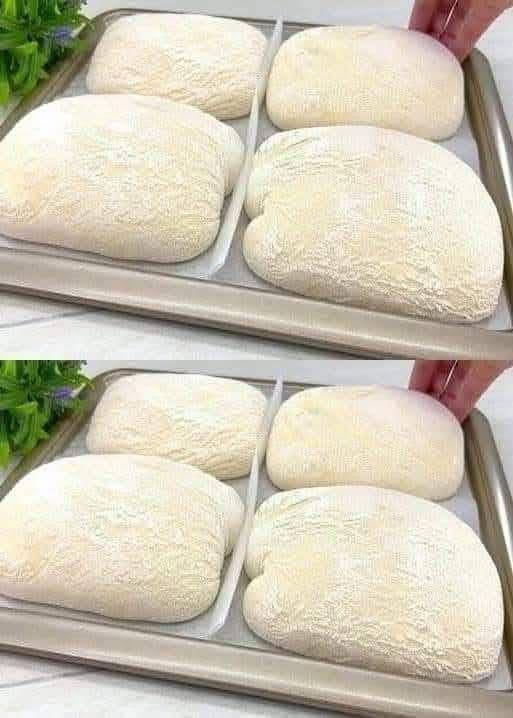
Shape the Loaves: Heavily flour your work surface and your hands. Gently pour the dough out onto the surface. It will spread out. Handle it as little as possible to preserve the air bubbles. Dust the top of the dough with more flour.
Using a floured bench scraper, divide the dough in half. Gently stretch each piece into a rough oblong/rectangle shape, about 9×4 inches each. Don’t worry about perfection; rustic is good!
Final Proof: Lift the loaves (or slide the parchment with the loaves on it) onto your prepared peel or baking sheet. Dust the tops lightly with flour and cover loosely with a clean kitchen towel or plastic wrap. Let rise for 45-60 minutes, until puffy. They won’t double, but they should look noticeably airy.
Part 4: Bake the Bread
Preheat: At least 45 minutes before baking, place a baking stone or steel on a rack in the center of your oven. Place a second, shallow metal pan (like a broiler tray) on the rack below it. Preheat your oven to 475°F (245°C).
Score & Slide: When the loaves are ready, you can make one or two shallow slashes on top with a sharp lame or razor blade, or leave them unscored for a more rustic look. Carefully slide the loaves, still on the parchment paper, directly onto the preheated baking stone.
Create Steam: Immediately and carefully pour 1 cup of hot water into the preheated shallow pan on the lower rack. Close the oven door quickly to trap the steam. This steam is essential for a crisp, shiny crust.
Bake: Bake for 20-25 minutes, rotating halfway through, until the crust is a deep golden brown and the internal temperature registers 210°F (99°C) on an instant-read thermometer.
Cool: Transfer the loaves to a wire cooling rack. It is crucial to let ciabatta cool completely (at least 1 hour) before slicing. This allows the steam to finish setting the crumb structure. Slicing too early will result in a gummy interior.
Baker’s Tips for Success
· Wet Dough is Good Dough: The high hydration (wetness) of this dough is what creates the signature large, irregular holes. Embrace the stickiness!
· Weigh Your Ingredients: For absolute consistency, using a kitchen scale is the best way to measure flour. Cup measurements can vary wildly.
· The Windowpane Test: To check if the dough is kneaded enough, take a small piece and gently stretch it. It should form a thin, translucent “windowpane” without tearing easily.
· No Stand Mixer? You can make this by hand, but it’s a workout. Use a sturdy wooden spoon and then your wet or floured hands to stir and “stretch and fold” the dough in the bowl for 10-15 minutes.
· Stretch and Fold (Optional but Helpful): During the first rise, you can perform a series of “stretch and folds.” Every 30 minutes, with wet hands, grab one side of the dough, stretch it upwards, and fold it over the center. Repeat for all four “sides.” This builds strength without adding flour.
· Storage: Keep cooled ciabatta in a paper bag at room temperature for 1-2 days. For longer storage, wrap tightly and freeze for up to 3 months. Reheat frozen loaves directly in a 350°F (175°C) oven for 10 minutes.
Enjoy the process and the incredible, professional-quality results! There’s nothing quite like tearing into a loaf of ciabatta you made yourself.