
Introduction
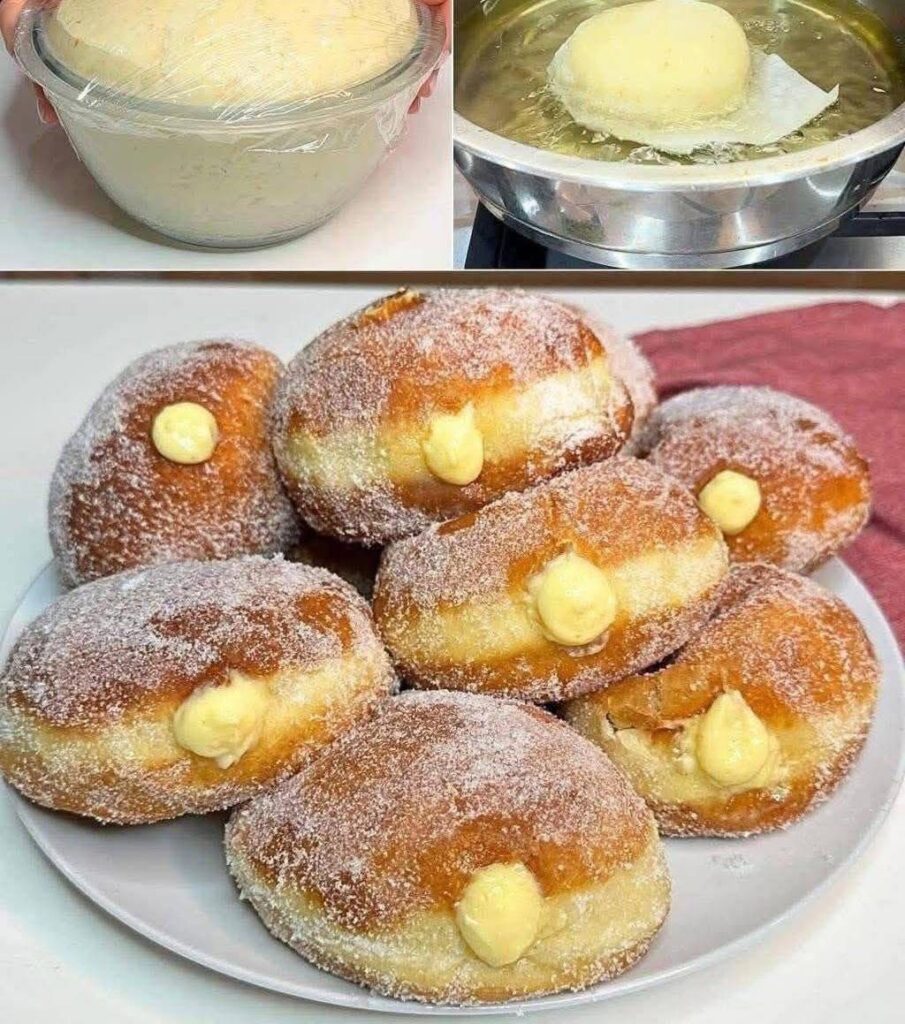
Prepare to fall head over heels for a dessert that’s truly explosive in flavor and texture: Creamy Fried Bombs! Imagine a golden-fried, sugar-dusted pillow of fluffy dough, yielding to the slightest touch, only to reveal a luscious, velvety cream filling that bursts forth with every bite. These aren’t just doughnuts; they’re an experience, a symphony of sweet indulgence that transports you straight to dessert heaven. Whether you know them as bomboloni, Berliner Pfannkuchen, or simply irresistible cream-filled delights, these homemade treats are guaranteed to become a new favorite in your repertoire.
What makes these “bombs” so utterly captivating? It starts with the dough – a perfectly proofed, yeast-leavened creation that fries up to a beautiful golden hue, light as air on the inside, with just a hint of chew. Then comes the magic of the filling: a rich, smooth, and aromatic custard, often infused with vanilla or a touch of citrus, that provides a delightful counterpoint to the fried exterior. Rolled in granulated sugar while still warm, they offer a satisfying crunch before melting away in your mouth. This recipe is designed to help you master the art of creating these delectable pastries in your own kitchen, transforming simple ingredients into something truly extraordinary.
While the idea of deep-frying might seem daunting to some, fear not! With a few key tips and careful attention to detail, you’ll be producing bakery-quality Creamy Fried Bombs that are far superior to anything you can buy. The satisfaction of biting into a warm, freshly fried, and generously filled doughnut that you made yourself is unparalleled. So, gather your ingredients, clear your schedule for a delightful baking adventure, and get ready to impress your taste buds and loved ones with these utterly irresistible, creamy, fried delights!
Nutritional Information
Per serving (approximate values):
Calories: 380
Protein: 7g
Carbohydrates: 50g
Fat: 17g
Fiber: 1g
Sodium: 200mg
Ingredients
For the Dough:
1 cup (240ml) warm milk (105-115°F / 40-46°C)
2 ¼ teaspoons (1 standard packet) active dry yeast
¼ cup (50g) granulated sugar, plus 1 teaspoon for yeast
1 large egg, at room temperature
1 large egg yolk, at room temperature
4 tablespoons (56g) unsalted butter, melted and cooled slightly
3 ½ cups (420g) all-purpose flour, plus more for dusting
¾ teaspoon salt
For the Creamy Vanilla Filling:
2 cups (480ml) whole milk
½ cup (100g) granulated sugar
¼ cup (30g) cornstarch
3 large egg yolks
2 tablespoons (28g) unsalted butter, softened
1 teaspoon pure vanilla extract
Pinch of salt
For Frying and Coating:
6-8 cups vegetable oil, canola oil, or other neutral oil, for deep frying
1 cup (200g) granulated sugar, for rolling
Instructions
Prepare the Dough: In a large bowl or the bowl of a stand mixer, combine the warm milk and 1 teaspoon of granulated sugar. Sprinkle the active dry yeast over the top and let it sit for 5-10 minutes until foamy, indicating the yeast is active.
Add the remaining ¼ cup granulated sugar, the egg, egg yolk, and melted butter to the yeast mixture. Whisk until well combined.
In a separate bowl, whisk together the flour and salt. Gradually add the dry ingredients to the wet ingredients, mixing with a wooden spoon or the dough hook of your stand mixer on low speed until a shaggy dough forms.
Increase the speed to medium-low and knead for 8-10 minutes (or by hand on a lightly floured surface for 10-15 minutes) until the dough is smooth, elastic, and pulls away from the sides of the bowl. It should be slightly sticky but manageable.
Lightly grease a large bowl with oil. Transfer the dough to the bowl, turning it once to coat. Cover the bowl tightly with plastic wrap or a clean kitchen towel.
First Proofing: Let the dough rise in a warm, draft-free place for 1 ½ to 2 hours, or until it has doubled in size. This can take longer in cooler environments.
Prepare the Creamy Vanilla Filling: While the dough is proofing, prepare the filling. In a medium saucepan, heat 1 ½ cups of the milk over medium heat until it just begins to simmer around the edges. Do not boil.